• Skip to main content
  • Skip to primary sidebar
Katie's Cucina
  • Home
  • About
    • Contact Me
    • FAQS
    • Privacy Policy
    • Accessibility Statement
    • Collaborate
  • Recipes
    • Appetizer
    • Asian
    • Breakfast
    • Bread
    • Comfort Food
    • Dairy Free
    • Dessert
      • Cookies
      • Ice Cream
    • Drinks
      • Smoothie
    • gluten free
    • Greek
    • Grilling
    • Holiday
      • Christmas
      • Halloween
    • Instant Pot
    • Italian
    • Katie Original
    • Main Dish
      • Beef
      • Chicken
      • Pork
      • Sausage
      • Turkey
      • Pizza
    • Mexican
    • One Pot Meal
    • Polish
    • Salad
      • Dressing
    • Sandwich
    • Seafood
      • Shrimp
    • Side Dish
    • Slow Cooker
    • Soups and Stews
    • Vegetarian
  • Travel
menu icon
go to homepage
  • Home
  • Recipe Index
  • About Me
  • Contact
search icon
Homepage link
  • Home
  • Recipe Index
  • About Me
  • Contact
Γ—

Katie's Cucina Β» Uncategorized

Food Photography – A Few of My Tips & Tricks

Published: Jan 18, 2012 Β· Modified: Apr 18, 2022 by Katie Β· This post may contain affiliate links

Sharing is caring!

7 shares
  • Share
  • Tweet

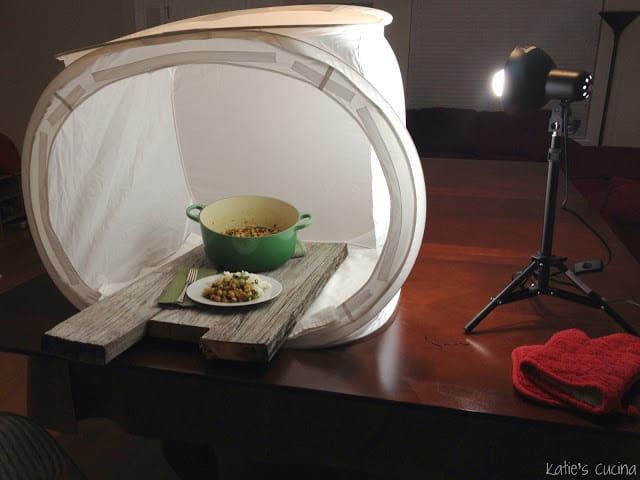
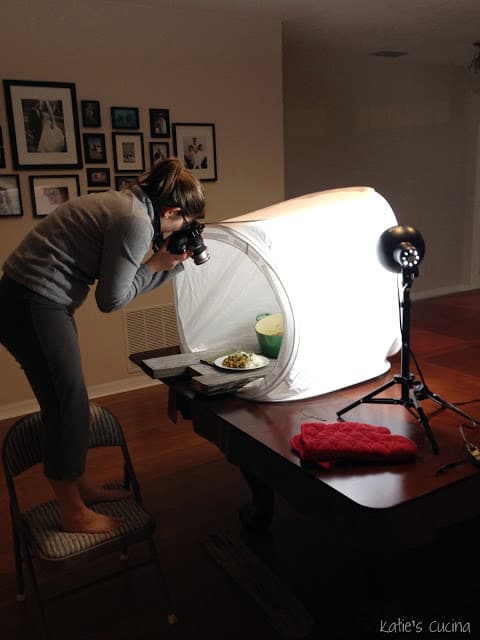
Tips and tricks I learned back in 2012 on Food Photography and where to start when photographing with artificial light at night.

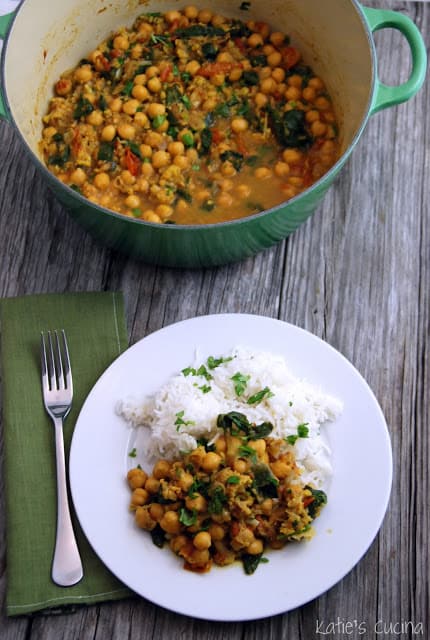
Ever since I attended Food Blog Forum last April my food photography has improved times 100! People think… what’s so difficult about photographing food? Until you start taking the time to photograph your food that’s when you realize how difficult food photography is. You essentially have to create a scene–a story of sorts. You have to make your photos look as good as they taste. What makes food magazines so enticing are the pictures that are found throughout.

The number one food photography tip I learned last year was…
 
 “It’s all about lighting”
 
After I learned more about lighting I began taking all my photo’s of food outside. I played around with the times of day and found that the best time for me to photograph my food during the summer months were at 7pm and by 7:45 my lighting opportunities were quickly fading away. This time frame worked well. I would get home from work, quickly cook dinner, then photograph whatever I cooked that evening and if I had other food to photograph I would then photograph it at that time. I was eating warm meals again, and enjoying them at the dinner table with my husband. My food was no longer cold from picture taking (I know those of you who blog about recipes can relate to this)! I would make an extra serving for my photos, and if I didn’t have time that night to photograph it I would pack it up in individual containers (a trick I learned from Jessica, The Novice Chef) and photograph it the next day. Then, daylight savings happened, and my lighting would vanish by 5:30pm at the latest. I struggled to get any decent photographs of my food. And then… I found this amazing photo studio kit. Well, to be honest, my good friend Christy told me about it. I added it to my Amazon Wish List, and asked for it for Christmas. I got it, and for some reason I didn’t play with it right away. Maybe I was a bit intimidated by the large black bag that had all the tools I’d need to create an almost perfect photo. It wasn’t until last week that I decided to pull it out and semi-set it up. *Semi – setup meant that only 1 light and one large pop-up tent was put together for my first photo shoot.
 
I placed my 30 x 30 pop-up light tent on my pool table top and set up one of the lights. I hauled my pieces of cut picnic table wood from the back yard into the pool room. I placed a towel in my pop-up light tent followed by my boards. I set up my scene and began snapping away. I was beyond amazed by my Christmas gift. My lighting was just as good if not better than what it is when I photograph outside! Very little photoshop work was needed, and needless to say I was so giddy at dinner about my Christmas gift that I hardly had an appetite to eat my Chickpea Curry! 
 
Now, don’t get me wrong. I still have a lot of photography skills to work on. I still have my days when I don’t achieve a “picture perfect picture”; however, I feel so much more confident about my photography skills. For once I finally feel comfortable using my camera.
 
I like to see how other bloggers achieve photo’s. As you can tell from the picture above you would never imagine it to be inside a tent with uneven boards!?!!? Thankfully, my handy husband has already trimmed, glued, and nailed the boards together, and is working on a few more table top finishes for me. Maybe I’ll post about those in the coming weeks! 
 
Here are a few other food photography tips and tricks… 
 
Create a Scene. Tell a Story.
 
When you are setting up your photo try to imagine a scene you want to create. For inspiration I’ll look at various food magazines to give myself better ideas of how to setup a photo. I also look to my fellow bloggers who have truly grasped the “create a scene — tell a story” concept.
 
Source
 
If a cake has a fruit in it why not include pieces of the fruit in the photo. Without even looking at the title of the cake I know this cake has something to do with oranges. 
 
Let’s look at my Chickpea Curry photo. I propped my french oven up on a towel so that it was tilting toward the camera (I realize some of the liquid shifted because of this). Because the curry had just came off the stove top I moved it with oven mitts (hence the oven mitts near the lamp). Try to add a nice cloth napkin to the scene. We never use cloth napkins in my house, so I had to go out and buy a few cloth napkins for food photography. The one in this picture I sewed myself. It’s also reversible so I can use it for various photos. 
 
Think about what your reader’s would want to see. Make the most undesirable food look desirable! Challenge yourself to that… 
 
Here are a few of my favorite food bloggers that creating amazing stories for their readers and I want to share them with you in case you don’t already look to them for inspiration:
Tartelette, The Novice Chef, Food Plus Words, Love and Olive Oil, The Little Kitchen, bell’alimento, Inspired Taste, and the list could go on for hours! 
 
Don’t be afraid to play with your food! 
 
Make your food look pretty! If this means you need to use chopsticks or your bare hands to move around pieces of food so that they look more appealing to the eye–do so! No one will know except you and at the end of the day you are the one eating the food! 
 
Wipe all excess liquid spots off your plate. Can you find the one tiny spot on my super white plate in the Chickpea Curry photo above? I can and it drives me crazy! 
 
 
Tools you should always have on hand when food styling (via Helen Dujardin's food styling class):-chopsticks-Q-tips-water spritzer-tweezer-paint brush-straws 
 
 
You don’t need a fancy DSLR camera to achieve amazing photos. 
 
Last year, while attending Food Blog Forum I had the opportunity to attend a private class with the amazing Helene Dujardin. I learned so much in those 3 short hours. I learned that I really needed to take the time to learn my fancy-pants camera. The camera doesn’t make the picture… the person behind the lens does! Tkae time and play with your camera. 
 
“It’s self taught–you learn how to use your camera no matter what. 
You can build the fundamentals with the point and shoot.” –Helene Dujardin


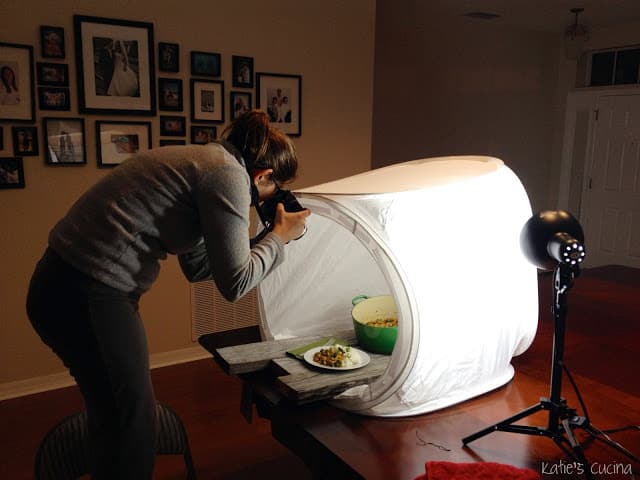
I’ve been getting kind comments and emails complementing my food photography over the past few months, and I sincerely appreciate it! It helps motivate me to keep creating amazing food photos. I ultimately wanted to share about my new photography toy; Square Perfect SP500 Platinum Photo Studio, and a few tips and tricks that I’ve found useful over the past year. In no way am I a professional. I am constantly learning new tips and tricks daily! I hope this mini tutorial on food photography will help bring your photos to a new level like it has mine! 


Lastly, Food Blog Forum is coming back to Orlando… March 17th. If your live near Central Florida or want a fun Disney/Foodie getaway I highly suggest you attend this conference. This conference is what motivated me to keep on blogging! Plus you get to meet some amazing food bloggers in real life! Oh, and TECHmunch is coming to Tampa, Florida… I plan to attend that conference as well in April! 


Disclaimer: I did not receive the Square Perfect SP500 Platinum Photo Studio for free. I received it as a gift and am writing this post solely based on my own opinions. 

« Chickpea Curry
Loaded Potato Skins »

About Katie

Katie is a busy mom of 2 children who loves to feed her family delicious meals that don't take hours to cook! She started her blog 10 years ago as a way to help others get cooking in the kitchen.

Reader Interactions

Comments

  1. Teresa

    January 22, 2016 at 7:16 pm

    Love this! Β Just started blogging and I’m still working on my photography skills, so any and all advice is great. Can’t wait to try these out. Β Thank you so much.

    Reply
    • Katie

      January 24, 2016 at 4:48 pm

      Thanks Teresa! I wrote that post years ago. I now only use natural light and only photograph during the day. I’ll save food and photograph the next day if it’s too dark.

  2. Isabelle

    October 27, 2015 at 8:49 am

    Thanx for the tips but mostly…congratulations for your baby. xx

    Reply
    • Katie

      October 27, 2015 at 8:56 am

      Thanks Isabelle!

  3. Trisha

    April 16, 2015 at 8:01 am

    Thank you so much for this information! I am currently stationed in Japan and the sun goes down by 4 p.m. Everyday! You pop up tent is exactly what this newbie blogger needs to really enhance her photos! Thanks so much!

    Reply
    • Katie

      April 17, 2015 at 1:18 pm

      Glad this helped you!

  4. Sandra

    February 02, 2015 at 6:15 pm

    Ok I just read your comments and I don’t understand what you mean by “find a shaded area”. How does the shade help and what lighting would you use if you are in a shaded area? I have a dslr but just learning to use it.

    Reply
    • Katie

      February 03, 2015 at 10:11 pm

      Hi Sandra, thanks for reading. I never photograph food in direct sunlight. I will photograph in my covered porch where I get ample sunlight but nothing that is directly hitting my food. That’s what I mean by ‘finding a shaded area”. good luck!

  5. Sandra

    February 02, 2015 at 6:12 pm

    Really helpful information! Please do consider an update. I would love to learn more!

    Reply
    • Katie

      February 03, 2015 at 10:12 pm

      Thanks Sandra–I’m hoping to add a new food photography tips and tricks post sometime this year!

  6. Tessa Machen

    January 27, 2015 at 7:19 am

    Thank you! great info!! xo T

    Reply
  7. Dei

    January 07, 2015 at 9:06 pm

    I loved yur post and your photos. Nice job. Thanks for sharing your tips!Β 

    Reply
    • Katie

      January 07, 2015 at 9:13 pm

      Thanks Dei! I really need to do an updated post. I’ve learned so much more since publishing this post years ago!

  8. Lynsey @ Eternally Wanderlyn

    October 22, 2014 at 10:53 am

    That is such a cool kit! Now I want one. I might add it to my Christmas list this year. πŸ™‚

    Reply
    • Katie

      October 23, 2014 at 9:35 am

      It works great Lynsey!

  9. Taylor Bishop

    June 04, 2014 at 2:09 pm

    Very helpful post! I am wanting that little tent! I find it’s hard to take photos outside with glare and shadows. May I ask what kind of lens you use?

    Reply
    • Katie

      June 05, 2014 at 6:36 am

      Taylor–you need to try to find a shaded area in your home or a window that has lots of light that comes through. I typically will use a white foam core poster board to bounce light in the darker areas. I wrote this post over 2 years ago and need to do a follow up of what I’ve now learned. If you don’t have any shaded areas the tent might be a good idea. Glad I could help. Oh and I’m using a standard stock lens that comes with my DSLR.

  10. Louida

    March 21, 2014 at 2:39 pm

    Thank you for sharing your tips Katie. I’m not a food blogger but a product review blogger and only been using my cell phone to take pics. I go outside when there is sunlight sometimes and take my photos. Hopefully some day I’ll buy a new camera and lighting kit.

    Reply
    • Katie

      March 23, 2014 at 9:42 am

      Hi Louida. Thanks for stopping by. You can still achieve nice photos on a smart phone. You are definitely doing it right by stepping outside and allow for the best light possible. Try to stay away from direct light (like harsh light right around noon time). The best times to photograph are in the morning and afternoon). You could even spend a few dollars on a white foam board to help bounce light off the dark areas. Even on a cell phone it works! Keep up the good work.

  11. Antionette Blake

    March 21, 2014 at 11:05 am

    Thank you so very much for sharing these tips. Photographing food is harder than people – lol!

    Reply
    • Katie

      March 23, 2014 at 9:44 am

      Thanks Antionette! This post is so old–I need to do a follow up post on what I’ve learned since publishing that post. I’m always working on improving my food photography! You are so right–people have no idea how difficult it is to photograph food and make it look great!

  12. Katie

    March 08, 2014 at 12:16 pm

    Hi Katie, love this post and especially your behind-the-scenes shots. I am putting together a compilation post of Food Photography resources for my blog, and I think this a post that would really resonate with my readers. I was wondering if I could get permission to use one of your images in the post (along with appropriate attribution) along with my links to this article. Thanks!

    Reply
    • Katie

      June 09, 2014 at 1:49 pm

      Hi Katie–sorry I’m just getting to this now. I had a baby in March and just clearing out comments. Yes, you may use a photo> I really need to do an updated post since my food photography has improved so much!

  13. Meghan

    August 14, 2012 at 6:50 pm

    This is a GREAT article!! I’ve been working on my food photography lately and it drives my husband crazy. He keeps saying why don’t you just stop taking pictures and eat the food? But I know the photos draw people into what the recipe has to say. I love your tip about creating a story with your food. It’s great. I’m definately inspired and encouraged by this post. Thank you

    Reply
    • Katie

      August 15, 2012 at 7:29 am

      Meghan, thank you for stopping by Katie’s Cucina. I’m glad my food photography post resonated with you. I would save an extra plate of food or cook something that doesn’t need to be consumed right away and take a good half hour to an hour and work on your food photography in natural light with a few additional props–think about the ingredients you put in the food and work from there. Study magazines and see how they have styled the photograph. I’m always working on my food photography and there are days that I’ll have made a dish, photographed it quickly, and then we eat dinner and I go back and look at the pictures and I’m not happy. If you can make an extra plate of food and photograph it after dinner or the next day it takes less pressure off of you. I also highly suggest you buy the book Plate to Pixel–great food photography resource! Good luck!

  14. scratch-made wife

    January 22, 2012 at 1:55 pm

    Wow! Thank you so much for your insight and all of the amazing tips. And thanks for the newest addition to my Amazon wish list. πŸ™‚

    Reply
  15. Kiran @ KiranTarun.com

    January 20, 2012 at 7:00 am

    Amazing post — i like the idea of behind-the-scenes of food photography composition. And I love that kit! So want it now πŸ˜€ It gets so dark at 5pm recently. Hate that!

    Reply
  16. MommyNamedApril

    January 20, 2012 at 4:22 am

    great post, katie! i've just added the light kit to my wishlist as well! helen's presentation was absolutely my favorite part of FBF last year πŸ™‚

    Reply
  17. Carrie's Experimental Kitchen

    January 19, 2012 at 10:18 pm

    Great tips Katie, thank you for sharing. Your photos always look beautiful! You have an award waiting for you πŸ™‚ http://carriesexperimentalkitchen.blogspot.com/2012/01/two-new-awards-versatile-blogger.html

    Reply
  18. Mary

    January 19, 2012 at 10:18 pm

    Katie, there is some wonderful information in this post. I am new to your blog and reading it led me to browse through your earlier entries. I'm so glad I did that. You've created a great spot to visit and I really enjoyed the time I spent here. I'll definitely be back. I hope you have a great evening. Blessings…Mary

    Reply
  19. Sunshine

    January 19, 2012 at 4:00 pm

    Nice write-up of your setup and FBF Orlando. I'm really hoping to go this year.

    I *just* heard about TECHmunch so I'm totally going to check it out.

    Reply
  20. Rachel @ Not Rachael Ray

    January 18, 2012 at 4:22 pm

    Great post! I'm thisclose to pulling the trigger on one of those!

    Reply

Did you make this recipe? Let me know! Cancel reply

Your email address will not be published. Required fields are marked *

Recipe Rating


Primary Sidebar

I'm Katie Jasiewicz: home cook, food blogger, and recipe developer. A busy mom of two children who loves to feed her family delicious meals that don’t take hours to cook! My mission is to create easy-to-make modern comfort food for the busy family. (more)

Featured On

brand logos in collaage; food network, MSN, kitchenaid, country living, world market, etc

Most Popular Recipes

  • Broccoli Cheese Casserole spooned out of white baking dish
    Broccoli Casserole with Ritz Crackers
  • Green bowl filled with white gravy and a tray of biscuits next to the gravy bowl.
    Homemade White Gravy
  • white bowl filled with mashed potato soup.
    Mashed Potato Soup
  • Dried spaghetti on a countertop.
    KitchenAid Pasta Recipe

Easter Recipes

  • White platter filled with sliced turkey and carrots with gravy poured on top.
    Slow Cooker Turkey Breast
  • White oval dish filled with creamed spinach on a blue and white striped towel.
    Steakhouse Creamed Spinach
  • Oval red baking dish filled with corn casserole.
    Jiffy Corn Casserole
  • Square photo of a white bowl filled with cooked baby carrots.
    Instant Pot Carrots

Footer

logos of places Katie's Cucina has been featured on; food network, KitchenAid, Stonyfield, Country LIving, Women's Health, etc.

COPYRIGHT Β© KATIE'S CUCINA 2009-2022
AS AN AMAZON ASSOCIATE I EARN FROM QUALIFYING PURCHASES.
PRIVACY POLICY Β· ACCESSIBILITY STATEMENT Β· DESIGN BY GRACE + VINE STUDIOS

7 shares