
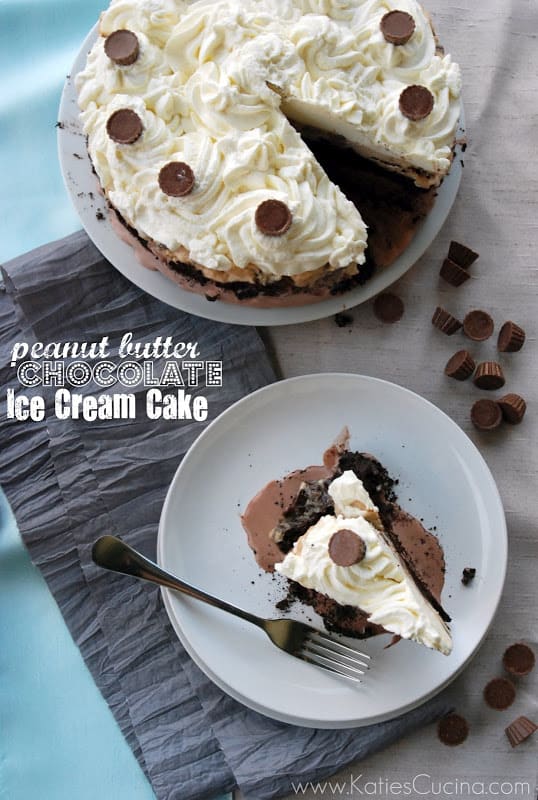
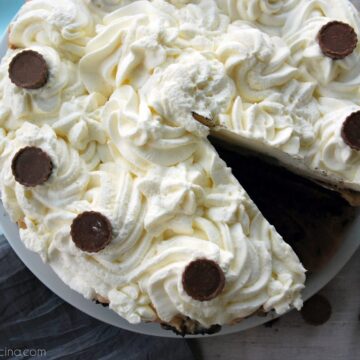
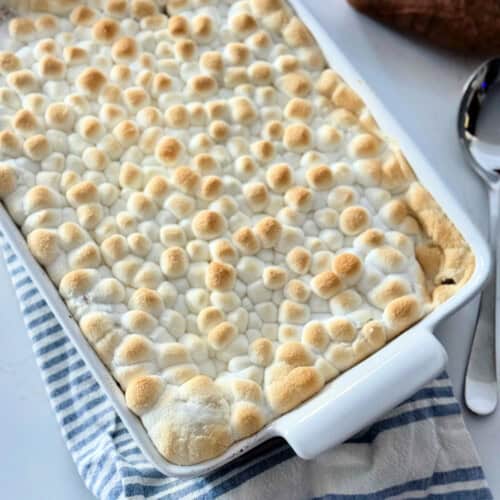
My Peanut Butter Chocolate Ice Cream Cake is semi-homemade using store bought ice cream, crushed chocolate wafers, hot fudge and homemade whipped cream piped on top. Making an ice cream cake at home is easier then you might think!

I’ve always enjoyed store bought ice cream cakes. That was until I figured out how to make my own. My easy recipe for Peanut Butter Chocolate Ice Cream Cake uses store bought ice cream which helps make this easy to put together. I originally made this cake for my dad’s Birthday. Prior to cutting into this cake I did ask my mom if she thought my dad would mind that a slice was missing. She assured me he would be grateful for the cake even if a slice was missing!
Directions
How to Assemble an Ice Cream Cake
- Remove ice cream from freezer and let thaw for 30 minutes.
- Using a spring form pan place 2 pints of chocolate ice cream in the bottom of the pan; smoothing it to an even level.
- In a large zip lock baggie place the entire package of chocolate wafers in the bag and smash them until they are fine crumbs. Add the entire bag of crumbs to the spring form pan, smoothing them out to an even layer.
- Followed by the one and a half cups of Homemade Hot Fudge Sauce (smoothed). Carefully add 1 pint of peanut butter ice cream to the top layer and smooth out. Place the spring form pan uncovered in the freezer while you make the whipped cream.
How to Make Whipped Cream
- Using a KitchenAid Stand Mixer attach the whisk attachment. Begin beating the heavy cream on medium speed. Once the cream begins to thicken add the powdered sugar, and once incorporated bump the speed to high for a good minute or two. Add the whipped cream to a piping bag with tip.
How to Pipe Whipped Cream

- Remove the ice cream cake out of the freezer and begin piping the whipped cream on to the cake (in whatever design you’d like). Once the cake top is covered with whipped cream place back in the freezer for 1 hour so that the cream will begin to harden.
- Remove from the freezer, add mini peanut butter cups on top. Then place plastic wrap and tin foil over the top of the cake and freeze for at least 6 hours prior to serving.
FAQs
I always prefer to use whipped cream to frost my ice cream cakes. You can spread on the whipped cream on top or pipe like I did with a large piping tip.
You can get typically 12 servings for a 9″ springform cake pans.
Yes, an ice cream cake must be stored in the freezer to ensure it does not melt. It is okay to place in the refrigerator about 30-60 minutes before you are ready to serve it.
A springform cake pan features a removable bottom insert and sides that can be sealed like walls around the removable bottom.
I like to bring the ice cream cake out up to 15 minutes before serving. Any more then that and you risk to starting to melt.
Tips & Tricks
Here are a few of my favorite tips and tricks when making homemade ice cream cake.
- Freeze – Store the cake up to one week in the freezer.
- Yields – This recipe yields 12 slices.
- Whipped Cream – You’ll want to watch your whipped cream. You’ll know its done when you pull the top of the mixer back and the cream sticks to the whisk.
- Peanut Butter Cups – I like to use mini peanut butter cups, but you can also use large ones cut in half if you desire.
- Piping Tip – For this recipe I used the 1M Open Star Piping Tip. Looking for more piping techniques? Check out my How to Pipe Canned Frosting post.
- Spring-Form Pan – I used a 9″ spring-form pan for this ice cream cake. This is needed so you can easily remove the cake from the pan.
Ice Cream Recipes

Still craving more ice cream? You can check out my 100+ Ice Cream Recipes post or check out a few of my favorites below.
If you make this peanut butter ice cream cake recipe, I would be honored and love for you to take the time to leave a star rating and comment! I spend hours developing and testing these recipes, and always love to hear feedback and user experience!
Don’t forget to FOLLOW ME on Facebook, Pinterest, and Instagram, and subscribe to my email list!
Peanut Butter Chocolate Ice Cream Cake
Equipment
- Spring Form Pan
Ingredients
- 2 pints Chocolate Ice Cream
- 1 9 oz package of Famous Chocolate Wafers
- 1-½ cups Hot Fudge Sauce
- 1 pint Peanut Butter Ice Cream w/ Chopped Peanut Butter Cups
- 2 cups heavy cream
- 3 tablespoon powdered sugar
- 12 Mini Peanut Butter Cups for garnish
Instructions
Assembling Ice Cream Cake
- Remove ice cream from freezer and let thaw for 30 minutes.
- Using a spring form pan place 2 pints of chocolate ice cream in the bottom of the pan; smoothing it to an even level.
- In a large zip lock baggie place the entire package of chocolate wafers in the bag and smash them until they are fine crumbs. Add the entire bag of crumbs to the spring form pan, smoothing them out to an even layer.
- Followed by the one and a half cups of hot fudge sauce (smoothed). Carefully add 1 pint of peanut butter ice cream to the top layer and smooth out. Place the spring form pan uncovered in the freezer while you make the whipped cream.
Make Whipped Cream
- Using a KitchenAid Stand Mixer attach the whisk attachment. Begin beating the heavy cream on medium speed. Once the cream begins to thicken add the powdered sugar, and once incorporated bump the speed to high for a good minute or two. Add the whipped cream to a piping bag with tip.
Pipe Whipped Cream
- Remove the ice cream cake out of the freezer and begin piping the whipped cream on to the cake (in whatever design you'd like). Once the cake top is covered with whipped cream place back in the freezer for 1 hour so that the cream will begin to harden.
- Remove from the freezer, add mini peanut butter cups on top. Then place plastic wrap and tin foil over the top of the cake and freeze for at least 6 hours prior to serving.
Notes
- Freeze – Store the cake up to one week in the freezer.
- Yields – This recipe yields 12 slices.
- Whipped Cream – You’ll want to watch your whipped cream. You’ll know its done when you pull the top of the mixer back and the cream sticks to the whisk.
- Peanut Butter Cups – I like to use mini peanut butter cups, but you can also use large ones cut in half if you desire.
- Piping Tip – For this recipe I used the 1M Open Star Piping Tip.
- Spring-Form Pan – I used a 9″ spring-form pan for this ice cream cake. This is needed so you can easily remove the cake from the pan.
Nutrition
Disclosure: There are affiliate links present in this post. That means if you click on a link and purchase something. I will receive a small percentage of the sale at no additional cost to you. Thank you for your continuous support of Katie’s Cucina!
Camellia Carranco
The meaning of the phrase “ice cream” varies from one country to another. Phrases such as “frozen custard”, “frozen yogurt”, “sorbet”, “gelato” and others are used to distinguish different varieties and styles. In some countries, such as the United States, the phrase “ice cream” applies only to a specific variety, and most governments regulate the commercial use of the various terms according to the relative quantities of the main ingredients.
Jessica@AKitchenAddiction
Oh my! Pretty sure I need a slice of this to get my week started off right!!
Katie
ha ha too funny! I wish I could have had a slice for breakfast this morning although I’m sure my body would not approve of that!
Cathy @ Noble Pig
Oh wow, this is beautiful…love all that peanut butter…slurp!
Katie
Ha ha thanks Cathy!
Jocelyn @BruCrew Life
Ok, so I want to come over too and have some cake with everyone:-) I’m loving all the peanut butter cups in it!!!
diane sykes
OMG – I am drooling on my keyboard!
Gotta try this soon!
diane sykes
OMG – I am drooling on my keyboard!
Gotta try this soon!
Katie
Ha ha thanks Aunt Di! We had it tonight to celebrate dad’s belated birthday! I’ll make you an ice cream cake the next time your in town!
Chung-Ah | Damn Delicious
Absolutely lovely! You know I can come over with Angie and we can all share this amazingness 🙂
DessertForTwo
Hi there, gorgeous cake! I need you in my life! 🙂
Katie
lol you are too funny! Thanks for stopping by!
Angie @ Big Bear's Wife
Amazing Katie!! You did a fantastic job on that! I’ll be over to help eat it soon lol.
Katie
Thanks for the kind compliments! I wish you lived closer I have 2/3 of this cake left in my freezer!!! Guess it will go to work on Monday!
JulieD
Umm, this looks to die for!! It’s so pretty and looks so professional…I want to dive right in!! Congrats on a great week of ice cream, Katie!!
Katie
Thanks Julie–I don’t feel like it looks professional. I still think it looks like a hot mess! Then again we are always so critical of ourselves! I survived ice cream week and so did my waistline!! Woohoo!